Install on AWS
This guide will perform a complete production-ready installation in your AWS environment using AWS CDK.
This is a complex multi step process, and requires high proficiency with AWS, Node.js, and command line tools.
Medplum strives to make this as easy as possible, but despite our best efforts, it is still challenging.
If you have any questions, please contact us or join our Discord.
If you are new to AWS CDK, we strongly recommend reading Getting started with the AWS CDK.
At a high level, the process of installing Medplum on AWS includes:
- Prerequisites
- Setting up IAM permissions
- Setting up an SES account
- Creating a config repo
- Setting up CDK
- Setting up Medplum CDK
- Running the Medplum init tool
- Deploying the CDK stack
- Boostrapping
- Synth
- Deploy
- Deploying the Medplum app
- Building the Medplum app with your config
- Deploying the Medplum app to AWS
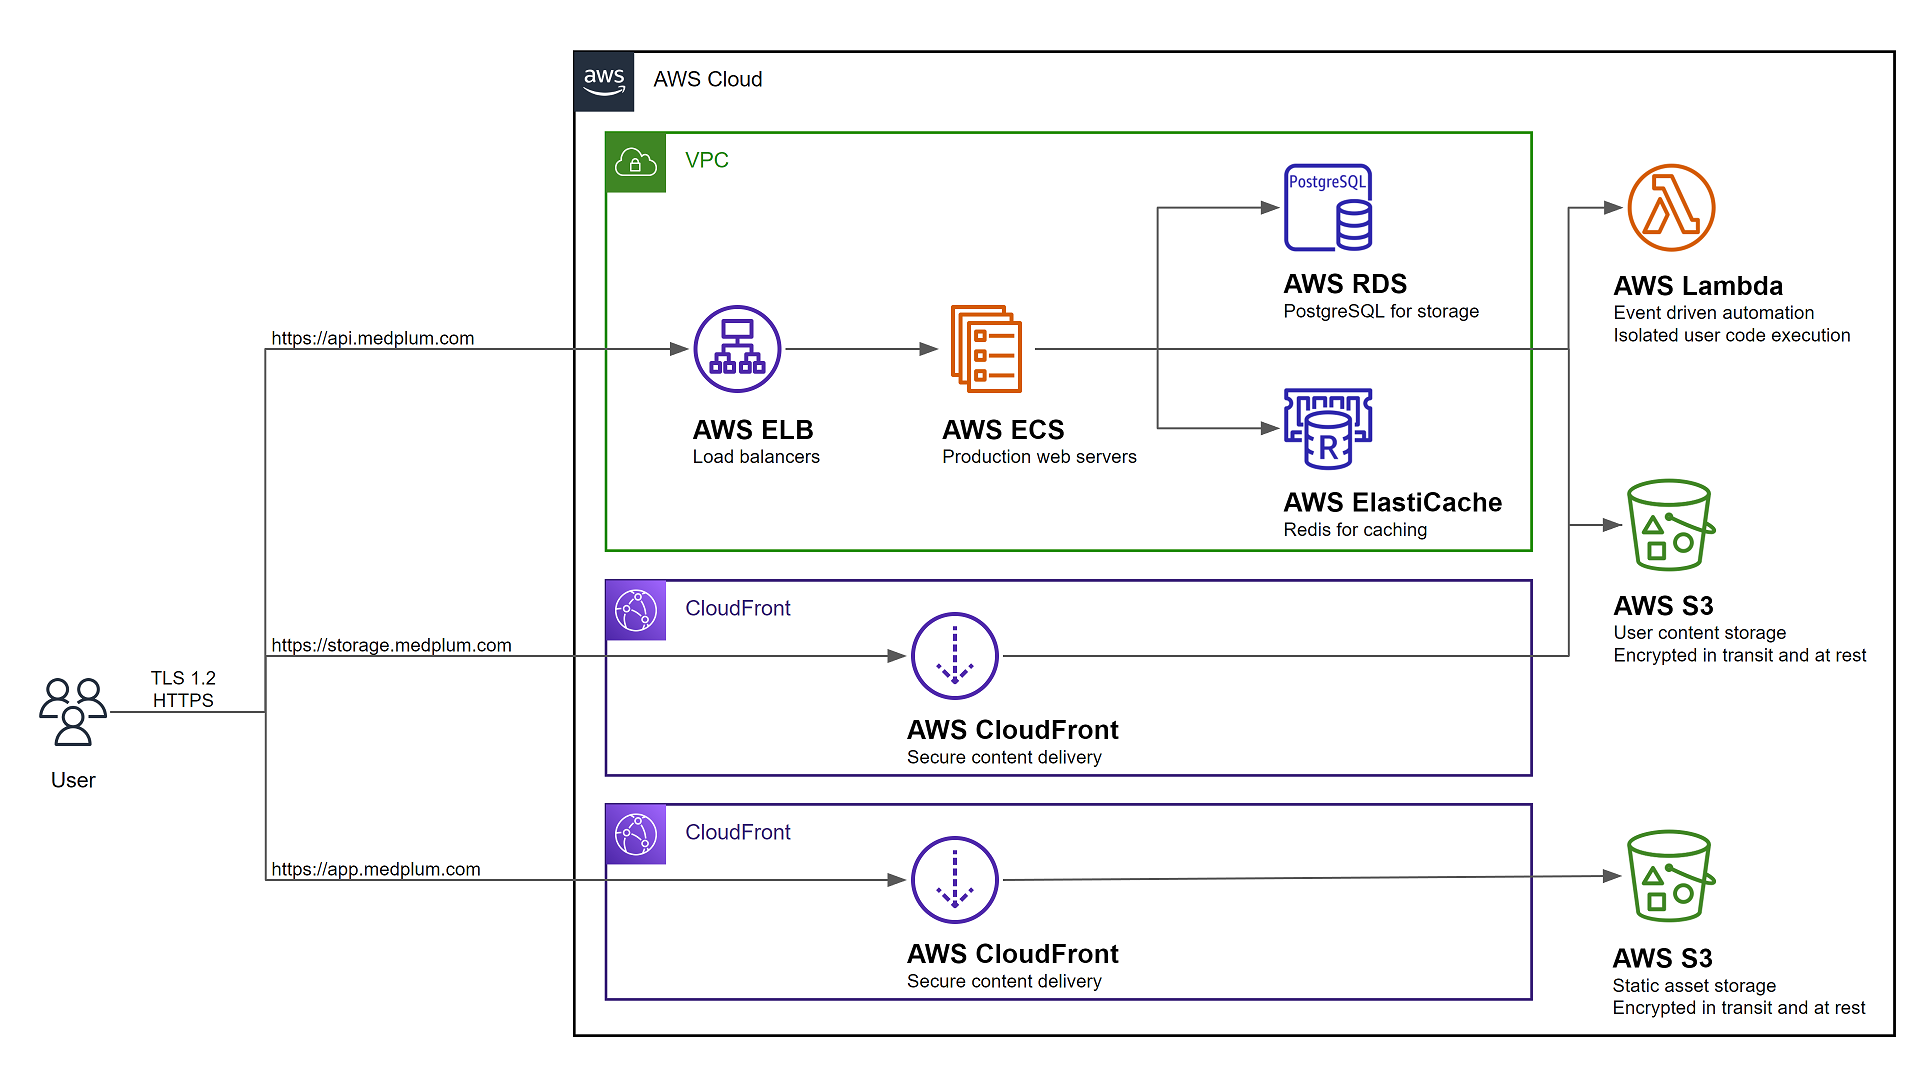
The resulting AWS configuration will look like the following:
Prerequisites
AWS Permissions
You will need permission to access the following AWS services:
| Service | Details |
|---|---|
| Elastic Compute Cloud (EC2) | Create a Virtual Private Cloud (VPC) and related security groups |
| Elasticache | Create a hosted Redis cluster for caching and task queue |
| Elastic Load Balancing (ELB) | Create a load balancer for server redundancy and high availability |
| Identity and Access Management (IAM) | Create service roles for the API server and bot lambdas |
| CloudFront | Securely deliver content with low latency and high transfer speeds |
| CloudWatch Logs | Create and manage log groups for server logs |
| Relational Database Service (RDS) | Create a hosted Postgres Aurora database |
| Route 53 | Create DNS entries for the services |
| Simple Storage Service (S3) | Host static web content, store and retrieve dynamic user content for file attachments |
| Secrets Manager | Store encrypted secret configuration details such as database credentials |
| Systems Manager (SSM) | Store configuration details |
| Web Application Firewall (WAF) | Protect your web applications or APIs against common web exploits and bots |
You will also need to setup your AWS credential file.
Setup SES
It is strongly recommended to setup an SES email address with production access, meaning that it can send email to any email recipient. Email is used to verify identities, send login instructions, and handle password reset requests.
Follow the Creating and verifying identities in Amazon SES guide to register an email address for system generated emails.
Setup a config repo
Create your config repo
Medplum recommends creating a separate git repository and npm project to manage your CDK infra-as-code. This repository will only contain JSON configuration files.
mkdir my-medplum-cdk-config
cd my-medplum-cdk-config
npm init -y
Medplum recommends pushing this git repository to your source control provider such as GitHub or GitLab.
Add CDK dependencies
If you have not already done so, add the common AWS CDK dependencies. This includes all of the base CDK capabilities and constructs.
npm i aws-cdk-lib cdk constructs
Add Medplum CDK dependency
Add the Medplum CDK dependency. This includes the Medplum CDK construct.
npm i @medplum/cdk
Add cdk.json
Create a new file called cdk.json with the following contents:
{
  "app": "node node_modules/@medplum/cdk/dist/cjs/index.cjs"
}
Run the init tool
Most AWS resources are automatically created using CDK, but some either cannot or are not recommended. Use the medplum-cdk-init tool to setup those resources and build the Medplum CDK config file.
npx medplum-cdk-init
Then follow the prompts.
Upon completion, the tool will:
- Generate a Medplum CDK config file (i.e., medplum.demo.config.json)
- Optionally generate an AWS CloudFront signing key
- Optionally request SSL certificates from AWS Certificate Manager
- Optionally write server config settings to AWS Parameter Store
Make note of the CDK config file name.
See Config Settings for more details on each of the individual configuration settings.
CDK Bootstrap
Bootstrapping is the process of provisioning resources for the AWS CDK before you can deploy AWS CDK apps into an AWS environment.
Run CDK bootstrap:
npx cdk bootstrap -c config=my-config.json
Learn more about bootstrapping: https://docs.aws.amazon.com/cdk/latest/guide/bootstrapping.html
CDK Synth
The synth step catches logical errors in defining your AWS resources.
Run CDK synth:
npx cdk synth -c config=my-config.json
CDK Deploy
When you are ready to actually execute the CDK configuration, use the deploy command.
Run CDK deploy:
npx cdk deploy -c config=my-config.json
CDK Diff
If you make changes to the CDK config, you can use the diff command to see how it will change your AWS resources.
Run CDK diff:
npx cdk diff -c config=my-config.json
Deploy
Now let's switch back to the main Medplum repo. If you have not done so already, see Clone the repo.
Setup your app
Add a .env file in packages/app with your deployment details:
MEDPLUM_BASE_URL=https://api.medplum.example.com/
GOOGLE_CLIENT_ID=***Your google client ID for Google auth***
RECAPTCHA_SITE_KEY=***Your reCAPTCHA site key for user verification***
TODO: Update the build to pull from a centralized config file rather than environment variable.
Build the app
From the root of the Medplum repo, run:
npm run build -- --filter=@medplum/app
See the Build page for more details.
Deploy the app
After the AWS infrastructure is setup, you need to deploy the front-end web application.
Use the deploy-app.sh script with a APP_BUCKET environment variable:
TODO: Update the script to pull from a centralized config file rather than environment variable.
export APP_BUCKET=app.example.com
./scripts/deploy-app.sh
or
APP_BUCKET=app.example.com ./scripts/deploy-app.sh
Advanced
Bot Lambda Layer
Optional: If you intend to use Medplum Bots, you will need an AWS Lambda Layer.
You can use the deploy-bot-layer.sh script to automate this process:
./scripts/deploy-bot-layer.sh
See the Creating and sharing Lambda layers guide to learn more.
Ongoing
Upgrade the server
If using a custom Docker image, first build and deploy your image:
# Build and push using normal Docker commands
docker build . -t "$DOCKER_REPOSITORY:$TAG"
docker push "$DOCKER_REPOSITORY:$TAG"
To deploy the latest version to your AWS Fargate cluster, use the AWS CLI:
# Update the Medplum Fargate service
aws ecs update-service \
  --region "$AWS_REGION" \
  --cluster "$ECS_CLUSTER" \
  --service "$ECS_SERVICE" \
  --force-new-deployment
Troubleshooting
Cannot assume role
You may receive a warning such as:
current credentials could not be used to assume 'arn:aws:iam::[ACCOUNT_ID]:role/cdk-hnb659fds-file-publishing-role-[ACCOUNT_ID]-us-west-2',
but are for the right account. Proceeding anyway.
First, make sure that the specified role exists in your AWS account. If it does not exist, make sure that you ran the cdk bootstrap command.
Next, make sure that your AWS account has permission to assume the role via sts:AssumeRole. You may need to add an IAM policy to add permission.
{
  "Sid": "assumerole",
  "Effect": "Allow",
  "Action": ["sts:AssumeRole", "iam:PassRole"],
  "Resource": ["arn:aws:iam::*:role/cdk-*"]
}
"IAM Full Access" is not enough! The IAM Full Access policy does not include sts:AssumeRole.
Try verbose mode
All CDK operations support verbose logging by adding the --verbose flag. Verbose logging can often reveal hints about confusing behavior.
npx cdk synth --verbose -c config=my-config.json